SELF LEVELING EPOXY

While it’s likely not worth it for the average DIY router build, if your steel is in poor shape dimensionally like mine was, you’ll likely get your moneys worth out of the process.

Equipment and Tools Needed

Precision Level

Epoxy and associated equipment, plus mold making material

Prep

1. Pick up a precision level. I picked up a precision level for ~75 euro. Without such a level you really can’t judge whether or not your epoxy pouring helped or hindered the ‘flatness’ of the steel. I used a 0.05mm per 1m level that was 315mm long. More accurate precision levels exist, but will be harder to use since it has such a narrow reading.
 
2. Since the level is probably used, you can verify that it works correctly by shimming under some parallel bars or whatever other method until it reads perfectly level. Flip the level around 180 degrees. If it doesn’t still read level, then your precision level needs adjustment. If it reads level, then its good to go.

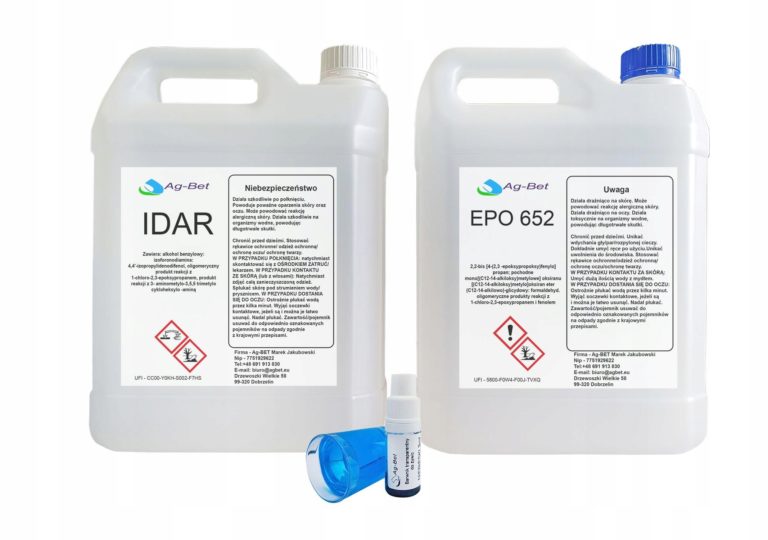
3. Epoxy – I used self-leveling epoxy that was designed for pours up to 1cm thickness. It was EPO 652. My goal thickness for the epoxy is about 3-5mm so it’s plenty.
 
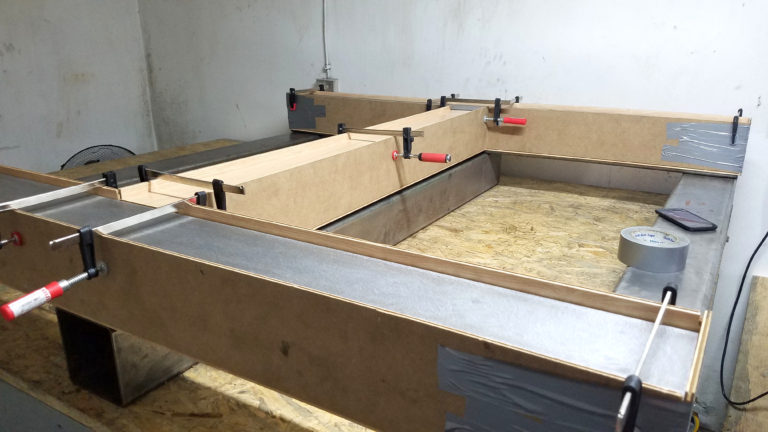
4. Form – there’s a variety of forms you can use – I used some cheap PVC flooring to make forms that clamped to the sides of my steel, but you can also use weatherstripping or other methods to make pours that fit only under where the blocks will attach, or other methods. Bear in mind that self-leveling epoxy makes a meniscus at the edges (it climbs the walls of your mold slightly) so you will want your mold to be wider than the minimum to allow for removing it. [http://www.mycncuk.com/threads/8197-Use-of-epoxy-for-levelling](http://www.mycncuk.com/threads/8197-Use-of-epoxy-for-levelling) has some good information as well
 

5. Additional stuff – you’ll need a container to mix the epoxy in as well as some method to seal your form against the steel. I used silicone caulk to seal the edges of the form, but if you use such caulk ensure that you are using neutral cure, not acid cure, as acid cure will rust your steel as it dries.

Y Axis

Y Axis almost ready. Before pouring, I put a thin bead of silicone along the edges of the form
1. With your printNC frame assembled and bolted in position, take your level and get your Y axis to be as level as you can achieve both in the X and Y direction. If you have some bow to your steel, you can take measurements of multiple locations along the beams and use excel to create a best-fit line, which can be used to calculate the reading required to achieve a good ‘average’ flatness from a single point along each axis. The purpose of getting the steel as flat as possible is just to ensure that the epoxy is generally flat over the surface and maintains a generally consistent thickness.
 
2. Once your steel is flat, lightly sand and clean the surfaces to provide some good adhesion, and wipe down with a degreaser of choice. Then build the form. For Y axis, I also built a ‘bridge’ that connected the two Y axis beams so that the beams would be as level and parallel with each other as possible. For my bridge, I used a wooden beam with the PVC flooring on top shimmed until it was about 2mm below the bottom of the Y axis beams, just to ensure that flow was unimpeded.
 
3. At this point, you can apply mold-release, or another agent to the faces of the forms (but not the face of the steel) to allow easier removal from the epoxy. I have also seen a thin layer of petroleum jelly such as vaseline recommended. I did not use any mold release as the PVC doesn’t adhere very well with epoxy, and ended up tearing the PVC coating off two of the planks when removing them. Since I sanded down the edges of the epoxy it is mostly without consequence, but doing so could have helped speed up the process slightly.
 
4. Mix your epoxy according to the instructions provided with it, and pour. I mixed about 1.5L at a time for the Y axis. It helps if you have a partner who can help you mix epoxy, it will help ensure the process goes smoothly. Keep your eyes peeled for any leaks in the mold, as the epoxy is like water and any leaking will ruin the pour.
 
5. Ensure that the garage maintains the temperatures required for the duration of the epoxy cure time. For my epoxy, it took approximately 5 days to fully cure. Many epoxies have a minimum temperature of even as high as 22C and desired temperature even higher, so keep that in mind.
 
6. Once the epoxy is fully cured, remove the form.
 
7. I used a hacksaw to cut away the epoxy of the bridge. The nubs that are left from where the bridge attached easy to remove when sanding the epoxy.
 
8. I sanded down the meniscus of the epoxy at the edges, being careful not to sand the surface of the epoxy that my rails would set on.
 
9. I then verified that my rails were level in both axes using the precision level.
 

10. DO NOT MOVE YOUR Y AXIS OR YOUR TABLE, YOU NEED IT TO STAY IN POSITION FOR COMPLETION OF THE X AXIS

X Axis

X Axis Theory

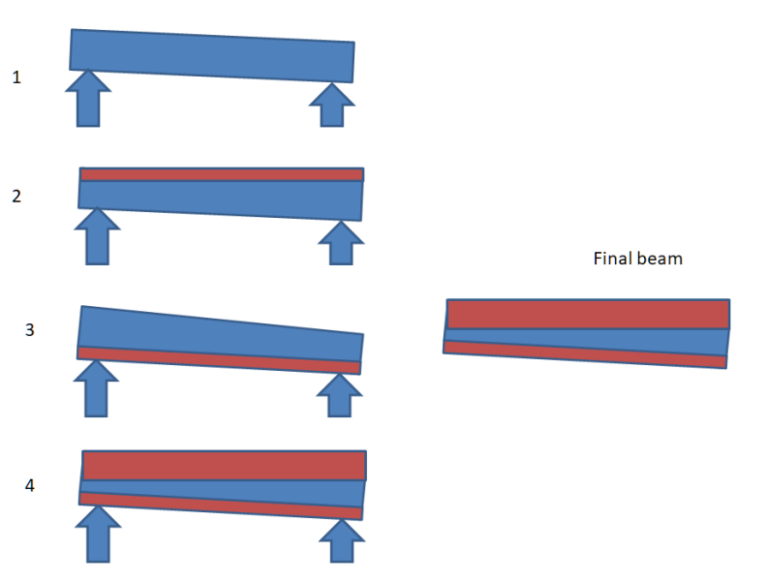
The X axis presents a unique challenge because it is double-sided. Here’s a breakdown of the problem at hand

This diagram demonstrates pouring epoxy on both sides of the X axis without a solid reference surface. Some error can be mitigated by flipping the beam 180 degrees after the first pour, but it does not eliminate error entirely. In other words, pouring epoxy onto the beam, and then merely flipping it over, does not necessarily result in a beam with two surfaces that are parallel with each other.

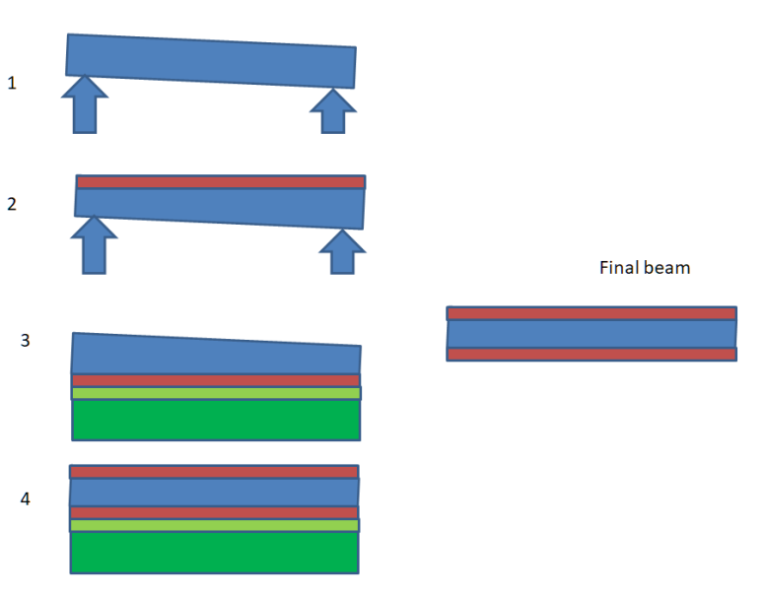
However, since in pouring the Y axis we already have one reference surface, we can pour the epoxy for side one by laying the beam directly onto the epoxy surface and then placing that surface against our existing Y axis surface as a “reference” so that we can achieve as close to a flat result as possible.

Execution

1. I essentially performed the exact same steps for X axis side one that I performed for Y. First level the steel as best as possible, prep and clean the steel, then create and seal a form for the epoxy.
 
2. You can place the X axis onto one of your Y axis beams, as it will generally level the steel, so long as you are careful not to damage the epoxy surface when placing the steel down upon it.
 
3. Once side one of the X axis has been poured, once again you must wait 5 days or however long our cure time for epoxy states while keeping the garage at temperature. Once cured, then remove the form.
 
4. Then, I once again sanded down the meniscus on the edges.
 
5. Since we now have one fully cured side, carefully clean both epoxy surfaces of dust or other debris, then place the X axis epoxy surface flat down onto the “Reference surface”, which is one of our Y beam’s that we created in step 1.
 
6. Repeat the steps again for side two.
 

7. Once its been cured / sanded, you are complete.

Final Notes

Be careful with your epoxy surfaces. The important surfaces will be protected from damage by the steel once you place and bolt your rails and blocks in place. The relatively large surface area of the rail will not compress the epoxy, but if you drop your drill onto the epoxy before your rails are in place, it can gouge the surface. Small gouges and pits from bubbles are without consequence so long as they do not push material up above the general surface of the epoxy.

When it comes to the drill / tap / centerpunch steps, the epoxy surface is mostly without consequence. I used a carbide scribe instead of a traditional centerpunch for centerpunching into the epoxy, as it allowed me to create a nice divot in the surface of the epoxy without having to hammer too hard and potentially create a crack in the epoxy. When it comes to drilling and tapping, there was no real difference in my approach vs the non-epoxy surface.

For painting, the preferred method is to place the rails and blocks onto the epoxy, cover them completely with painters tape, and then paint the surfaces, so that you do not damage your reference surface you worked so long to create. This is preferably done once you have squared and straightened your rails, so that you do not have to shift the rails once the surface is painted.